web

CSS Properties

CSS Properties

CSS Properties, Web Developers के लिए आवश्यक Tools हैं| जो उन्हें Web Page के Presentation और Layout को Control करने की Permnission देते हैं।

1. background-color Property

Background-color Property का use HTML Element के Background Color को Define करने के लिए किया जाता है। यह किसी Element के Background के Color को Style करने का एक Straightforward Way Provide करता है।

Example:

CSS


/* Setting the background color of a div */
div {
background-color: #3498db; /* Using a hex color code */
}

HTML


<div>This is a div with a blue background.</div>

Output:

2. background-image Property

Background-image Property Developers को किसी Element के Background में Image Add करने की Permission देती है। यह Visually रूप से आकर्षक Background या Pattern बनाने के लिए use होता है।

Example:

CSS


/* Adding a background image to a section */
section {
background-image: url(‘background-image.jpg’); /* Specify the image path */
background-repeat: no-repeat; /* Prevent image repetition */
background-size: cover; /* Scale the image to cover the element */
}

HTML


<section>This section has a background image.</section>

Output:

3. border-style property

border-style Property का use किसी Element के Border के Style को Specify करने के लिए किया जाता है। विभिन्न Border Effect को Apply करने के लिए इसे border-width और border-color जैसे अन्य Border-Related Propertie के साथ जोड़ा जा सकता है।

Example:

CSS


/* Creating a dashed border for a button */
button {
border-style: dashed;
border-color: #e74c3c; /* Specify border color */
border-width: 2px; /* Set border width */
}

HTML


<button>This button has a dashed border.</button>

Output:

4. Height and Width Property

Height और Width Property HTML Element के Dimensions को Control करते हैं| जिससे Developers को Pixel या अन्य Relevant Units में इसकी Height और Width Specify करने की Permission मिलती है।

Example

CSS


/* Setting the height and width of a div */
div {
height: 200px;
width: 300px;
}

HTML


<div>This is a div with a specified height and width.</div>

Output:

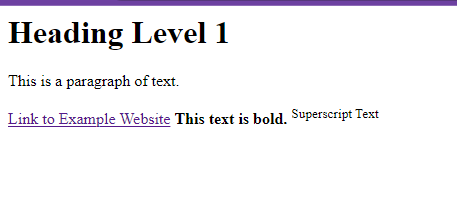
5. color and text-align Properties

Color Property, Text का Color Define करता है| जबकि Text-align Property का Use किसी Element के भीतर Text को Align करने के लिए किया जाता है।

Example:

CSS


/* Applying color and text alignment to a paragraph */
p {
color: #333; /* Setting the text color */
text-align: center; /* Aligning the text to the center */
}

HTML


<p>This is a paragraph with centered text and a specific text color.</p>

Output:

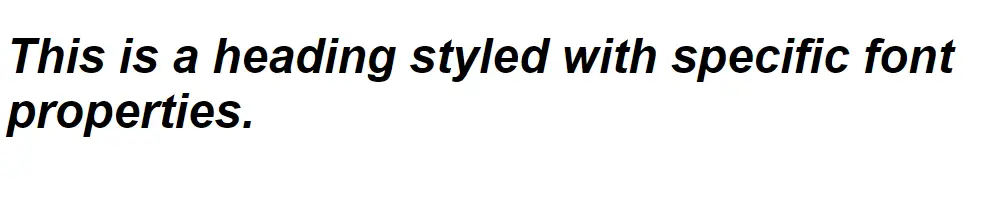
6. font-family, font-style, font-size, and font-weight Properties

Font-Family Property, Text के लिए उपयोग किए जाने वाले Font को Define करती है| Font-Style Define करती है, कि Text Italic या Oblique होना चाहिए| Font-size Text का Size निर्धारित करता है, और Font-Weight Font की Thickness निर्धारित करता है।

Example:

CSS


/* Styling a heading with specific font properties */
h1 {
font-family: ‘Arial’, sans-serif; /* Setting the font family */
font-style: italic; /* Making the font italic */
font-size: 24px; /* Setting the font size */
font-weight: bold; /* Making the font bold */
}

HTML


<h1>This is a heading styled with specific font properties.</h1>

Output:

7. Box Model in CSS (Margin, Border, Padding)

Web Development में CSS Box Model एक Fundamental Concept है, जो Web Pages के Layout और Design को Define करती है। इसमें तीन आवश्यक Component शामिल हैं- Margin, Border और Padding ।

7.1. Margin

Margin HTML Element के चारों ओर का स्थान है, जो इसे अन्य Element से अलग करता है। यह किसी Element के लिए एक Outer Boundary बनाता है, जो Adjacent Elements के संबंध में उसके स्थान को प्रभावित करता है।

Example:

CSS


/* Applying margin to a div */
div {
margin: 20px; /* Setting a 20-pixel margin on all sides */
}

HTML


<div>This div has a margin of 20 pixels on all sides.</div>

Output:

7.2. Border

Border, HTML Element के Outer Edge को Define करता है। Element को एक विशिष्ट रूप देने के लिए इसमें विभिन्न Styles, Color और Thicknesses हो सकती हैं।

Example:

CSS


/* Adding a border to an image */
img {
border: 2px solid #333; /* Creating a 2-pixel solid border with a dark gray color */
}


HTML


<img src=”image.jpg” alt=”An image with a border”>

Output:

7.3. Padding

Padding किसी Element के Content और उसकी Border के बीच का स्थान है। यह आपको Content और Elemnet के Border के बीच की दूरी को Control करने की Permission देता है।

Example:

CSS


/* Setting padding for a paragraph */
p {
padding: 10px; /* Applying 10 pixels of padding to all sides */
}

HTML


<p>This paragraph has padding of 10 pixels on all sides.</p>

Output:

web

CSS Implementation, CSS Selectors

Introduction of CSS

CSS (Cascading Style Sheets) Web Developement का एक Fundamental Component है, जो Document Content को Document Presentation से अलग करने की Permission देता है। यह देखने में आकर्षक और Web Page को Responsive करने में महत्वपूर्ण Role निभाता है। किसी Web Page के भीतर CSS को Apply करने के तीन मुख्य तरीके हैं- Inline, Internal और External। प्रत्येक Method के अपने विशिष्ट use के Cases और Benifit हैं।

Inline CSS

Inline CSS में Style Attribute का use करके Style को सीधे HTML Element पर Apply करना शामिल है। हालांकि यह अलग-अलग Element पर Styles को Apply करने का एक Quick Way Provide करता है, लेकिन Maintainability और Scalability में इसकी Limitations के कारण Large-Scale पर use के लिए इसकी Recommended नहीं की जाती है।

Example:


<!DOCTYPE html>
<html>
<head>
<title>Inline CSS Example</title>
</head>
<body>
<h1 style=”color: blue; text-align: center;”>Welcome to Our Website</h1>
<p style=”font-size: 16px; line-height: 1.6;”>This is an example of inline CSS.</p>
</body>
</html>

Output:

Internal CSS

Internal CSS को HTML Document के <head> Section में <style> Tag के भीतर Define किया गया है। यह एक ही Document में Multiple Element की Styling की Permission देता है। हालाँकि यह Inline CSS की तुलना में Maintainability में सुधार करता है, फिर भी Multiple Web Page पर Reusability के मामले में इसकी Limitations हैं।

Example:


<!DOCTYPE html>
<html>
<head>
<title>Internal CSS Example</title>
<style>
h1 {
color: blue;
text-align: center;
}
p {
font-size: 16px;
line-height: 1.6;
}
</style>
</head>
<body>
<h1>Welcome to Our Website</h1>
<p>This is an example of internal CSS.</p>
</body>
</html>

Output:

External CSS

External CSS में एक अलग CSS File बनाना और <head> Section में <link> Tag का use करके इसे HTML Document से Link करना शामिल है। यह Method Style के Centralization को सक्षम बनाती है, जिससे Multiple Web Page पर Consistent Design लागू करना आसान हो जाता है। Complex Website के लिए बड़े पैमाने पर CSS के Manage करने के लिए यह सबसे Recommended Approach है।

Example:

HTML file (index.html)


<!DOCTYPE html>
<html>
<head>
<title>External CSS Example</title>
<link rel=”stylesheet” type=”text/css” href=”styles.css”>
</head>
<body>
<h1>Welcome to Our Website</h1>
<p>This is an example of external CSS.</p>
</body>
</html>

CSS file (styles.css)


h1 {
color: blue;
text-align: center;
}
p {
font-size: 16px;
line-height: 1.6;
}

Output:

CSS Selectors

CSS (Cascading Style Sheet) Web Technology का एक महत्वपूर्ण Component है, जो Web Developer को Web Page के Presentation और Layput को Define करने की Allow देता है। CSS Selectors विशिष्ट HTML Element को Target करने और उन पर Style को लागू करते हैं|

ID Selectors

ID Selectors किसी विशिष्ट HTML Element को उसकी Unique id Attribute के Base पर Target करते हैं। ID Selector को Element के Id Value के बाद # Symbol द्वारा किया जाता है। यह HTML Document में Unique होना चाहिए|

Example:

CSS file (styles.css)


#header {
background-color: #336699;
color: #fff;
}

HTML file (index.html)


<!DOCTYPE html>
<html>
<head>
<title> CSS Selectors </title>
<link rel=”stylesheet” type=”text/css” href=”style.css”>
</head>
<body>
<div id=”header”>This is the header</div>

</body>
</html>

Output:

Class Selectors

Class Selectors, एक ही Class Attribute के साथ Multiple HTML Element को Style करने की Permission देते हैं। इन्हें (.) से Denote किया जाता है। इसके बाद Class का नाम आता है।

Example:

CSS file (styles.css)


.button {
background-color: #4CAF50;
color: #fff;
padding: 10px 20px;
}

HTML file (index.html)


<button class=”button”>Click me</button>
<button class=”button”>Submit</button>

Output:

Grouping Selectors

Grouping Selectors, Multiple Selectors को Comma से अलग करके Same Style को लागू करने की Permission देते हैं।

Example:

CSS file (styles.css)


h1, h2, h3 {
font-family: Arial, sans-serif;
color: #333;
}

HTML file (index.html)


<h1>Heading 1</h1>
<h2>Heading 2</h2>
<h3>Heading 3</h3>

Output:

Universal Selectors

Universal Selector (*) एक Page पर सभी HTML Element को Target करता है। Global Styles को Set करने के लिए इसका उपयोग अक्सर अन्य Selector के साथ Conjunction में किया जाता है।

Example:

CSS file (styles.css)

Title


* {
margin: 0;
padding: 0;
}

CSS Pseudo-classes

CSS Pseudo-classes का use किसी Element की विशेष स्थिति (Special State) को Define करने के लिए किया जाता है| जैसे कि जब Element को Hover किया जा रहा हो, या यह अपने Parent का पहला Child हो| Pseudo-classe एक (:) से पहले का Part होता हैं।

Example:

CSS file (styles.css)


a:hover {
text-decoration: underline;
color: #FF5733;
}

HTML file (index.html)


<a href=”https://example.com”>Hover over me</a>

web

XHTML, Introduction and Benefits of CSS, CSS Syntax

Introduction of XHTML

Extensible Hypertext Markup Language (XHTML) Web Technology में एक महत्वपूर्ण Markup Language है, जो Web Document के Structure और Content को Define करने में महत्वपूर्ण Role निभाती है। XHTML, HTML (Hypertext Markup Language) के Development के रूप में कार्य करता है, जो XML (Extensible Hypertext Markup Language) और HTML के Feature को मिलाकर एक अधिक Structured, Well-Formed और Universally रूप से Compatible Markup Language बनाता है।

Advantage of XHTML

XHTML को HTML की Limitations और Ambiguities को Remove करने के लिए Launch किया गया था। XML Rule का Follow करके XHTML यह सुनिश्चित करता है, कि Web Document सही ढंग से Formatted हैं| और एक Well-Defined Structure का पालन करते हैं, जिससे वे Human Reader और Web Browser दोनों के लिए अधिक Accessible हो जाते हैं। XHTML का use करने के कुछ प्रमुख Advantages Include हैं-

  • Compatibility: XHTML Document को HTML और XML Parsers दोनों द्वारा Parsed और Render किया जा सकता है, जो Cross-Browser Compatibility और Web Standard का पालन सुनिश्चित करता है।
  • Consistency: XHTML एक Strict Syntax लागू करता है, जिससे Web Document में Error और Inconsistencies की संभावना कम हो जाती है।
  • Accessibility: XHTML Semantic Markup के उपयोग को बढ़ावा देता है, जिससे Web Content Assistive Technologies और Search Engine के लिए अधिक Accessible हो जाती है।
  • Future-Proofing: XHTML Standards का पालन आपकी Web Content को Future-Proofs बनाता है| यह सुनिश्चित करता है, कि यह Develop हो रही Web Technologies के साथ Compatible बनी रहे।

XHTML Syntax

XHTML Syntax काफी हद तक HTML से मिलता-जुलता है। यह Element के बारे में Additional Information Provide करने के लिए Content और Attributes को Structured करने के लिए Tag का use करता है। हालाँकि, XHTML में HTML की तुलना में Strict Rule हैं। यहां XHTML Syntax के कुछ आवश्यक पहलू दिए गए हैं-

Document Structure of XHTML

प्रत्येक XHTML Document में निम्नलिखित Components के साथ एक Well-Defined Structure होनी चाहिए|


<!DOCTYPE html PUBLIC “-//W3C//DTD XHTML 1.0 Strict//EN”
“http://www.w3.org/TR/xhtml1/DTD/xhtml1-strict.dtd”>
<html xmlns=”http://www.w3.org/1999/xhtml”>
<head>
<title>My XHTML Page</title>
</head>
<body>
<!– Content goes here –>
</body>
</html>

  • <!DOCTYPE> Declaration: Document Type और Version Specify करता है।
  • <html> Element: Root Element जो Entire Document को Enclose करता है।
  • <head> Element: Document के बारे में Meta Information Include होती है।
  • <Title> Element: Document के Title को Define करता है।
  • <body> Element: इसमें Web Page की Visible Content Include होती है।

XHTML Elements and Tags

XHTML Element Tag में Enclosed हैं| Tag Case-Sensitive होते हैं, और Proper Nesting की आवश्यकता होती है।

Example:


<p>This is a <strong>strong</strong> paragraph.</p>

XHTML Attributes

Attributes Element के बारे में Additional Information Provide करती हैं। उनका Value हमेशा Quotes में Enclose होना चाहिए।

Example:


<img src=”image.jpg” alt=”An example image” />

Example: XHTML Document


<!DOCTYPE html PUBLIC “-//W3C//DTD XHTML 1.0 Strict//EN”
“http://www.w3.org/TR/xhtml1/DTD/xhtml1-strict.dtd”>
<html xmlns=”http://www.w3.org/1999/xhtml”>
<head>
<title>My First XHTML Page</title>
</head>
<body>
<h1>Welcome to XHTML</h1>
<p>This is a <strong>sample</strong> XHTML document.</p>
<ul>
<li>Item 1</li>
<li>Item 2</li>
<li>Item 3</li>
</ul>
</body>
</html>

Output:

Introduction of CSS

Cascading Style Sheets (CSS) एक Style Sheet Language है, जिसका उपयोग HTML जैसी Markup Language में लिखे Document के Presentation को Describe करने के लिए किया जाता है। यह Developers और Designers को एक साथ कई Web Pages के Layout और Appearance को Control करने की Permission देता है, जिससे पूरी Website पर एक Consistent View और Experience मिलता है। किसी Web Page के Content को उसके Design से अलग करके CSS, Large-Scale Website को Manage की Process को सरल बनाता है| और देखने में आकर्षक User-Friendly Interface के निर्माण को सक्षम बनाता है।

Benefits of CSS

  • Consistent Design: CSS कई Web Page पर Consistent Design बनाने की Permission देता है। Single External File में Styles को Define करके Developers यह सुनिश्चित कर सकते हैं, कि Same Design पूरी Website पर समान रूप से Apply होते हैं, जिससे एक Cohesive User Experience की सुविधा मिलती है।
  • Easy Maintenance: CSS के साथ, Developers External CSS File में Style को Modify करके आसानी से किसी Website के Design में Global Changes कर सकते हैं। यह सुविधा किसी Website के Design और Layout को Update करने की Process को महत्वपूर्ण रूप से सरल बनाती है, क्योंकि CSS File में किए गए परिवर्तन Automatically रूप से इसे Reference करने वाले सभी Pages पर Apply होते हैं।
  • Faster Page Loading: Content को Presentation से अलग करके CSS, Fast Page Loading Time Enable करता है। चूंकि Styling Information Externally रूप से Store की जाती है, Browser CSS File को Cash कर सकता है, जिससे बाद के Page Cached Style को फिर से Download करने के बजाय Reference करके अधिक Fast Load हो सकते हैं।
  • Responsive Design: CSS, Responsive Web Design के निर्माण की सुविधा देता है| जो विभिन्न Screen Size और Device के अनुकूल होते हैं। Media Queries और Flexible Layout Techniques का use करके Developers यह सुनिश्चित कर सकते हैं, कि उनकी Website Desktops, Tablets और Smartphones सहित विभिन्न Device पर एक Optimal देखने का Experience Provide करती हैं।

CSS Syntax

CSS Syntax में Rule का एक Set होता है, जो HTML Document में विभिन्न Element के लिए Styling Properties को Define करता है। प्रत्येक Rule में एक Selectors और एक Declaration Block शामिल होता है। Selector HTML Element की पहचान करता है, जिस पर Style Rule लागू किए जाएंगे| जबकि Declaration Block, Style Properties और उनके Corresponding Value को निर्दिष्ट करता है।

Example: CSS


/* Selects all the <p> elements and sets their text color to red */
p {
color: red;
}

/* Selects the element with the ID “header” and sets its background color to light blue */
#header {
background-color: lightblue;
}

/* Selects all elements with the class “btn” and sets their font size to 16 pixels */
.btn {
font-size: 16px;
}

Example: HTML with CSS


<!DOCTYPE html>
<html>
<head>
<style>
/* CSS styles */
h1 {
color: blue;
}
p {
color: red;
}
</style>
</head>
<body>

<h1>This is a heading</h1>
<p>This is a paragraph.</p>

</body>
</html>

web

Frames & IFrames, HTML Forms

Frames

Frames एक HTML Element हैं, जिनका use किसी Web Page को कई Section या Frames में Divide करने के लिए किया जाता है। प्रत्येक Frame में एक अलग HTML Document हो सकता है, जो आपको एक ही Browser Window में Multiple Web Pages को Display करने की Permission देता है। Frame को <frame> Element का use करके Define किया जाता है, जो <frameset> Structure का हिस्सा है।

Example: Create Vertical Frames

index.html


<!DOCTYPE html>
<html>
<head>
    <title>Frame tag</title>
</head>
  <frameset cols=”25%,50%,25%”>
    <frame src=”frame1.html” >
    <frame src=”frame2.html”>
    <frame src=”frame3.html”>
  </frameset>
</html>

frame1.html


<!DOCTYPE html>
<html>
<head>
    <style>
       div{
            background-color: #7fffd4;
            height: 500px;
        }
    </style>
</head>
<body>
    <div>
        <h2>This is first frame</h2>
    </div>
 </body>
</html>

frame2.html


<!DOCTYPE html>
<html>
<head>
    <style>
       div{
         background-color: #17b8b8;
         height: 500px;
       }
    </style>
</head>
<body>
    <div>
        <h2>This is Second frame</h2>
    </div>
 </body>
</html>

frame3.html


<!DOCTYPE html>
<html>
<head>
    <style>
       div{
         background-color: #3f0e80;
         height: 500px;
                      }
    </style>
</head>
<body>
                <div>
          <h2>This is Third frame</h2>
    </div>
 </body>
</html>

Output:

IFrames

IFrames (Inline Frame) Frame के समान होते हैं, लेकिन <iframe> Element का use करके Web Page के Content के भीतर Embedded होते हैं। इनका उपयोग आमतौर पर किसी Web Page के भीतर External Content, जैसे Maps, Video या Advertisements Display करने के लिए किया जाता है।

Example:


<!DOCTYPE html>
<html>
<head>
<title>IFrame Example</title>
</head>
<body>
<h1>Welcome to my website!</h1>
<p>Here is an Embedded Google Map:</p>
<iframe src=”https://www.google.com/maps/embed?pb=!1m18!1m12!1m3!1d12080.812532241707!2d-74.0069932296464!3d40.71277590405122!2m3!1f0!2f0!3f0!3m2!1i1024!2i768!4f13.1!3m3!1m2!1s0x89c259022121e4db%3A0x829496d9756f50f9!2sNew%20York%2C%20NY!5e0!3m2!1sen!2sus!4v1629838324887!5m2!1sen!2sus” width=”600″ height=”450″ style=”border:0;” allowfullscreen=”” loading=”lazy”></iframe>
</body>
</html>

Differences between Frames and IFrames

  • Usage: Frame का उपयोग किसी Web Page को कई Section में विभाजित करने के लिए किया जाता है, प्रत्येक Section एक अलग Web Page Dispaly करता है। IFrames का Use Single Web Page के भीतर External Content को Embed करने के लिए किया जाता है।
  • Syntax: Frame को <frameset> के भीतर <frame> Element का use करके Define किया जाता है, जबकि IFrames सीधे HTML Content के भीतर <iframe> Element का use करके बनाए जाते हैं।
  • Communication: एक ही Frameset के भीतर Frame Javascript का use करके एक दूसरे के साथ Communication कर सकते हैं। जबकि IFrames में एक Stricter Security Model होता है, और आमतौर पर Same-Origin Policy के कारण एक-दूसरे के साथ सीधे Communication नहीं कर सकते हैं।

HTML Form

HTML (Hypertext Markup Language) Web Page का Backbone है, और इसका उपयोग Internet पर Content के Structure के लिए किया जाता है। इसकी Essential Feature में से एक Form बनाने की क्षमता है, जो User को Data Intput करने की Permission देती है| जिसे आगे की Process के लिए Web Server पर Submit किया जा सकता है।

Syntax of an HTML Form


<form action=”server_script.php” method=”post”>
<!– Form elements go here –>
</form>

  • Action Attribute उस URL को Specify करते है, जहां Submit होने पर Form Data Send किया जाएगा।
  • Method Attribute Server पर Form Data Send करते Time उपयोग की जाने वाली HTTP Method को Define करती है। Comman Method GET और POST हैं।

Form Elements

HTML विभिन्न Form Element Provide करता है, जो User को विभिन्न प्रकार के Data Intput करने की Permission देता है। सबसे अधिक use किए जाने वाले Form Element में से कुछ में शामिल हैं-

  • Text Input

<label for=”username”>Username:</label>
<input type=”text” id=”username” name=”username” />

  • Password Input

<label for=”password”>Password:</label>
<input type=”password” id=”password” name=”password” />

  • Radio Buttons

<label>Gender:</label>
<input type=”radio” id=”male” name=”gender” value=”male” />
<label for=”male”>Male</label>
<input type=”radio” id=”female” name=”gender” value=”female” />
<label for=”female”>Female</label>

  • Checkboxes:

<label for=”subscribe”>Subscribe to Newsletter:</label>
<input type=”checkbox” id=”subscribe” name=”subscribe” value=”yes” />

  • Dropdown Select:

<label for=”country”>Country:</label>
<select id=”country” name=”country”>
<option value=”us”>United States</option>
<option value=”ca”>Canada</option>
<option value=”uk”>United Kingdom</option>
</select>

  • Text Area:

<label for=”comments”>Comments:</label>
<textarea id=”comments” name=”comments” rows=”4″ cols=”50″></textarea>

  • Submit Button:

<input type=”submit” value=”Submit” />

Example:

आइए कुछ Element के साथ एक Simple HTML Form बनाएं और Form Submit होने पर Output Display करें। इस Example में, हम Form Submissions को Handle और Submit किए गए Data को Display करने के लिए PHP का use करेंगे।

HTML Form:

index.html


<!DOCTYPE html>
<html>
<head>
<title>Sample Form</title>
</head>
<body>
<h1>Sample Form</h1>
<form action=”process.php” method=”post”>
<label for=”name”>Name:</label>
<input type=”text” id=”name” name=”name” /><br />

<label for=”email”>Email:</label>
<input type=”text” id=”email” name=”email” /><br />

<label>Gender:</label>
<input type=”radio” id=”male” name=”gender” value=”male” />
<label for=”male”>Male</label>
<input type=”radio” id=”female” name=”gender” value=”female” />
<label for=”female”>Female</label><br />

<label for=”comments”>Comments:</label><br />
<textarea id=”comments” name=”comments” rows=”4″ cols=”50″></textarea><br />

<input type=”submit” value=”Submit” />
</form>
</body>
</html>

PHP Processing Script:

process.php


<!DOCTYPE html>
<html>
<head>
<title>Form Submission Result</title>
</head>
<body>
<h1>Form Submission Result</h1>
<?php
if ($_SERVER[“REQUEST_METHOD”] == “POST”) {
$name = $_POST[“name”];
$email = $_POST[“email”];
$gender = $_POST[“gender”];
$comments = $_POST[“comments”];

echo “<p><strong>Name:</strong> $name</p>”;
echo “<p><strong>Email:</strong> $email</p>”;
echo “<p><strong>Gender:</strong> $gender</p>”;
echo “<p><strong>Comments:</strong> $comments</p>”;
}
?>
</body>
</html>

जब आप Form भरते हैं, और “Submit” Button पर Clcik करते हैं| तो आपके द्वारा Enter किया गया Data Process.php Script पर भेजा जाएगा, जो फिर Submit की गई Information को एक नए Page पर Display करेगा।

web

Table Tag & its Advantages and Limitation

Table Tag

HTML Table Tag का Use Tabular Form (Row * Column) में Data Display करने के लिए किया जाता है। एक Row में कई Column हो सकते हैं। <table> Element के  <tr>, <td>, और <th> Elements की Help से Tabular Form में Data Display करने के लिए एक Table बना सकते हैं। प्रत्येक Table में, Table Row को <tr> Tag द्वारा Define किया जाता है, Table Header को <th> द्वारा Define किया जाता है| और Table के Data को  <td> Tag द्वारा Define किया गया है।

HTML Tables का Use Page के Layout को Manage करने के लिए किया जाता है| जैसे- Header Section, Navigation Bar, Body Content, Footer Section आदि। लेकिन Webpage के Layout को Manage करने के लिए Table पर div Tag का use करने की Advice दी जाती है।

HTML Table Tags

Tag Description
<Table> यह एक Table को Define करता है।
<Tr> यह एक Table में एक Row को Define करता है।
<Th> यह एक Table में एक Header Cell को Define करता है।
<Td> यह एक Table में एक Cell को Define करता है।
<caption> यह Table Caption को Define करता है।
<Colgroup> यह Formatting के लिए एक Table में एक या अधिक Columns के समूह को Specify करता है।
<Col> इसका use प्रत्येक Column के लिए Column Properties को Specify करने के लिए <colgroup> Element के साथ किया जाता है।
<Tbody> इसका use Body के Content को एक Table में Implement करने के लिए किया जाता है।
<Thead> इसका use Header Content को Table में Implement करने के लिए किया जाता है।
<Tfooter> इसका use किसी Table में Footer Content को Group करने के लिए किया जाता है।

Attributes of the Table Tag

  • border: Table के चारों ओर Border की Width को Control करता है|
  • cellspacing: Table में Cells के बीच की Space की मात्रा को Control करता है|
  • cellpadding: Cell Border और Cell के भीतर Content के बीच के Space को Control करता है|
  • width: Table की Width Set करता है|
  • height: Table की Height Define करता है|
  • align: यह Container के भीतर Table के Horizontal Alignment को Control करता है|
  • bgcolor: Table का Background Color Set करता है|

Example:


<!DOCTYPE html>
<html>
<head>
<title>HTML Image Link Example</title></head>
<body>
  <table border=”1″ cellspacing=”0″ cellpadding=”10″ width=”100%”>
    <tr>
      <td align=”center” bgcolor=”#FF0000″>Red</td>
      <td align=”center” bgcolor=”#00FF00″>Green</td>
      <td align=”center” bgcolor=”#0000FF”>Blue</td>
    </tr>
  </table>
</body>
</html>

Output:

Advantage of Table

Easy to Understand and Navigate

Table user के लिए Web Page पर Content की Understanding और Navigate करना आसान बनाती हैं। एक Tabular Format में Data Organize करके, User उन Information को तुरंत Search कर सकते हैं, जिन्हें वे Search रहे हैं। इसके अतिरिक्त, Table का use बड़ी मात्रा में Data को Compact Format में Display करने के लिए किया जा सकता है, जिससे Information को Scan करना और Compare करना आसान हो जाता है।

Better Data Management

Table बड़ी मात्रा में Data को Manage और Manipulate करने का एक Efficient Way Provide करती हैं। Table का use करके, Web Developer Data को आसानी से Sort, Filter और Search कर सकते हैं, जिससे Analyze करना और Informed Decision लेना आसान हो जाता है। Table का use Calculations करने और Charts बनाने के लिए भी किया जा सकता है, जो Complex Data Set को देखने में मदद कर सकता है।

Customizable Design

HTML में Table को Webpage के Design से Match करने  के लिए Customized किया जा सकता है। Developer Table Element को Style करने और Table Cell, Border और Header के रूप को Customize करने के लिए CSS का use कर सकते हैं। CSS का use करके, Table को अधिक आकर्षक दिखने के लिए बनाया जा सकता है| और Webiste के Overall Design के साथ बेहतर Integrate किया जा सकता है।

Example:


<!DOCTYPE html>
<html>
<head>
<title>HTML Image Link Example</title></head>
<body>
  <table border=”1px solid”>
    <thead>
      <tr>
        <th>Product Name</th>
        <th>Price</th>
        <th>Stock Availability</th>
      </tr>
    </thead>
    <tbody>
      <tr>
        <td>Product 1</td>
        <td>$10.00</td>
        <td>In Stock</td>
      </tr>
      <tr>
        <td>Product 2</td>
        <td>$20.00</td>
        <td>Out of Stock</td>
      </tr>
      <tr>
        <td>Product 3</td>
        <td>$15.00</td>
        <td>In Stock</td>
      </tr>
    </tbody>
  </table>
</body>
</html>

Output:

Limitations of HTML Table

Feature Description
Inline Style HTML Table के लिए Inline CSS (Cascading Stylesheets) Support नहीं करता है।
Managing Multiple tbody Elements OASIS Exchange Table के विपरीत, HTML कई tbody Tag की अनुमति देता है। जबकि tbody Element को Divide करने या जोड़ने के लिए कोई Table Editing Function नहीं है |
Managing colgroup Elements HTML Column Group को Edit करने के लिए कोई Table Editing Function नहीं है।
Managing Header Cells (th) and Data Cells (td) जबकि Interface में Header Cell और Data Cell के बीच बदलने का कोई तरीका नहीं है, आप Table Editing Function का use कर सकते हैं| या Edit Change Markup Menu Item का use कर सकते हैं ।
web

Text Links & Image Link and Opening a Page in New Window

HTML Links

HTML Links को Hyperlinks के रूप में भी जाना जाता है, यह Webpage का एक Essential Part होता हैं। ये Users को Web Page के माध्यम से Navigate करने, तथा विभिन्न Source से Information को Access और एक Seamless Browsing Experience करने की Permission देते हैं। HTML Link एक Anchor Element है, जो दो Web Page या एक ही Page पर दो अलग-अलग Location के बीच Click करने योग्य Connection बनाता है।

HTML Link Syntax


<a href=”URL”> Link Text </a>

  • <a>: <a> Anchor Tag को Represent करता है, और Opening Anchor Tag से एक Link को Define किया जाता है|
  • href: इसका पूरा नाम Hypertext Reference होता है| href Anchor Tag का एक Important Attribute है| जो Destination Address को Define करता है| Destination URLs Standard Format में ही Define होने चाहिए|
  • Link Text: वह Text होता है, जो Users को दिखाई देता है| जो Clickable होती है|
  • </a> यह Closing Anchor Tag होता है|

Example:


<!DOCTYPE html>
<html>
<head>
<title>HTML Link Example</title>
</head>
<body>
<p>
Below is an HTML Link. By Clicking on it You Can Visit thelearnify.in
</p>
<a href=”https://thelearnify.in/”>Visit thelearnify.in </a>
</body>
</html>

Output:

Image and Multimedia Link

HTML Image Link बनाना बहुत Easy है, Image Add करने के लिए Image Tag का use किया जाता है| जब एक Image Link बनाते है, तो सिर्फ Image ही Show होती है| लेकिन जब Image के ऊपर Mouse Cursor को ले जाऐंगे| तो Cursor एक Hand के रूप में बदल जाता है| Link की तरह work करने लगता है|

Text Link में Display Text लिखना पड़ता है| और Multimedia Link में Text के स्थान पर कोई Multimedia File जैसे- Video, Image, Audio आदि को Add करना पड़ता है|

Example:


<!DOCTYPE html>
<html>
<head>
<title>HTML Image Link Example</title></head>
<body>
<p>
Below is an Image. By Clicking on it You Can Visit thelearnify.in
</p>
<a href=”https://thelearnify.in/”><img src=”image//2.png” height=”150px;” width=”500px;”></a>
</body>
</html>

Output:

https://thelearnify.in/

Type of HTML Link

  1. Internal Link

Internal Link एक Website का दूसरा URL होती है, अर्थात किसी Website के एक Document में Same Site के अन्य Documents की Links को Internal Links कहते है|

  1. External Link

External Link एक Website पर किसी दूसरी Website का URL होती है, अर्थात किसी Website पर दूसरी Website का URL या Specific Page URL को External Link कहते है|

  1. Download Link

HTML से Download Link भी बना सकते है| Download Links का use विभिन्न प्रकार की File को Downloadable बनाने के लिए किया जाता है, Word, PDF, Videos, Pictures, Audios आदि प्रकार की File को अपने Users को Download करा सकते है| Files को Downloadable बनाने के लिए File का Full Path लिखना पड़ता है|

Opening Page in New Window

HTML का Use करके New Window में एक Page Open करने का एक Technique है| जिसका Use, User को Current Page से Move किये बिना Additional Resource या Information Provide करने के लिए किया जाता है। Default रूप से HTML Link उसी Window या Tab में Open होते हैं, जिसमें Current Page है। हालांकि, “target” attribute का use करके एक Link को एक New Window या Tab में Open करने के लिए Configure करना Possible है।

Example:


<!DOCTYPE html>
<html>
<head>
<title>HTML Image Link Example</title></head>
<body>
<p>
Below is an Image. By Clicking on it You Can Visit thelearnify.in
</p>
<a href=”https://thelearnify.in/” target=”_blank”>Click here to open in a new window</a>
</body>
</html>

Output:

इस Case में, “href” Attribute Target Page का URL Specifies करती है, और “target” attribute “_blank” पर Set होती है| जो Indicate करती है, कि Page एक New Window में Open होना चाहिए। जब User Link पर Click करता है, तो एक New Browser Window या Tab में Open होगा| जिसमें Target Page Display होगा।

यह ध्यान रखना महत्वपूर्ण है, कि कुछ Web Browser, जैसे Chrome, किसी Website द्वारा Open की गई New Window या Tab को Block कर सकते हैं, खासकर अगर यह Popup Window या Advertisement है। इससे बचने के लिए New Window के बजाय नए Tab में Link Open होता  है।

web

Creating Lists : Ordered List, Unordered Lists, Definition Lists

Lists

Lists, Web Design के Fundamental Component हैं| जो Information को Structured और आसानी से Digestible Manner से Present करने के लिए Organizational Tool के रूप में कार्य करती हैं। Web Development में, आमतौर पर दो Primary Type की List का Use किया जाता है- Unordered Lists और Ordered Lists।

Unordered List

HTML में <ul> Tag द्वारा प्रदर्शित Unordered List, Item को Bullet या Unordered Fashion से Display करती हैं। ये List बिना किसी विशेष Sequence या Hierarchy के Information Display करने के लिए Ideal हैं। आप इसकी Styling भी कर सकते है|

  • disc – यह List Item को Bullet में Set करता है।
  • circle – इसके द्वारा List Item को Circle में Set किया जाता है।
  • square – यह List Item को Square में Set करता है।
  • none – इसके द्वारा List Item दिखाई नहीं देता है।

Example:


<!DOCTYPE html>

<html>

<head>

<title>HTML List Example</title>

</head>

<body>

<ul type=”square”>

<li>Computer</li>

<li>Tablet</li>

<li>Mobile</li>

</ul>

</body>

</html>

Output:Ordered List

Ordered Lists, जिन्हें HTML में <ol> Tag द्वारा Denoted किया जाता है, <ol> Tag का Use Item को Sequentially रूप से Numbered या Alphabetically रूप में Ordered Format में Present करने के लिए किया जाता है। प्रत्येक List Item को एक Number या Letter से Marked किया जाता है, जो Content को एक Clear Hierarchy Provide करता है।

The Type Attribute in Ordered List

Ordered List में Type Attribute का use List Style Type को Define करने के लिए किया जाता है| By Default <ol> List में List Items के लिए “Number” का use किया जाता है|

  1. Number (Default) – 1
  2. Uppercase Letter – A
  3. Lowercase Letter – a
  4. Uppercase Roman Number – I
  5. Lowercase Roman Number – i
  6. None

Example:


<!DOCTYPE html>

<html>

<head>

<title>HTML List Example</title>

</head>

<body>

<ol type=”I”>

<li>Computer</li>

<li>Tablet</li>

<li>Mobile</li>

</ol>

</body>

</html>

Output:

Definition List

HTML में एक Definition List Term और उनकी Corresponding Definition की एक List है। इसे <dl>, <dt> और <dd> Tags का use करके बनाया जाता है।

<dl> Tag का use Definition List Create करने के लिए किया जाता है, जबकि <dt> Tag का use Term को Define करने के लिए किया जाता है, और <dd> Tag का use इसकी Corresponding Definition को Define करने के लिए किया जाता है।

Example:


<!DOCTYPE html>
<html>
<head>
<title>HTML Comment Example</title>
</head>
<body>
<dl>
    <dt>Term 1</dt>
    <dd>Definition 1</dd>
    <dt>Term 2</dt>
    <dd>Definition 2</dd>
</dl>
</body>
</html>

Output:
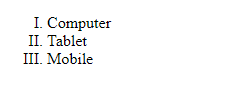
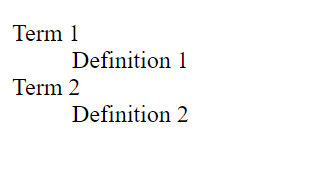
इस Example में, Terms “Term 1” और “Term 2” हैं, और उनकी Corresponding Definition “Definition 1” और “Definition 2” हैं।

Information को Clear और Concise Manner से Organize करने के लिए Definition List का use किया जा सकता है। वे अक्सर Glossaries, Dictionaries और अन्य प्रकार की Reference Material में use किए जाते हैं।

Default Styling के अलावा, Definition List को आपके Webpage के Design से Match करने के लिए CSS (Cascading Style Sheets) का use करके Style किया जा सकता है। इसमें Term और Definition के Font, Font Size, Color और Space को बदलना शामिल हो सकता है।

Image Tag

Image, Webpage को ज्यादा Attractive और Beautiful बनाती है| Readers भी बिना Image के साथ बनाए गए Webpage की Comparison में Image के साथ बनाए गए Blog Post को ज्यादा Like करते है| इसलिए HTML में Image Element को जोडा गया है| Image Element का use HTML Document में Picture Insert करने के लिए किया जाता है| <img> Tag द्वारा Image को Define किया जाता है|

एक HTML Document में विभिन्न Format में Images को Insert किया जा सकता है| आप PNG, JPEG, GIFs, आदि Format में Image को Add कर सकते है| हम जिस भी Format में Image को Use करना चाहते है, उस Format को हमे बताना पडता है|

Image Element Attributes

  • src – इस Attribute का use Image के Source URL को Define करता है|
  • alt – इस Attribute से Image के बारे में बताने के लिए किया जाता है|
  • style – Style Attribute से Image पर CSS Rules को Apply किया जाता है|
  • width & height – ये दोनो Attributes अलग-अलग use किए जाते है| इनके द्वारा Image के Width और Height को Define किया जाता है|
  • align – इसके द्वारा Image Alignment को Define किया जाता है|
  • border – Image Border को Border Attribute से Define किया जाता है|
  • title – Image को Title देने के लिए इस Attribute का use किया जाता है|

Example:

<!DOCTYPE html>
<html>
<head>
<style>
.center {
display: flex;
justify-content: center;
align-items: center;
height: 100vh; /* This ensures the image is centered vertically */
}
</style>
</head>
<body>
<div class=”center”>
<img src=”image.jpg” alt=”Image” />
</div>
</body>
</html>

Output:

web

Text Formatting

Text Formatting

HTML कई प्रकार के Text Formatting Tag Provide करता है, जो Developers को Webpage पर Text के लिए विभिन्न Style और Effects को Apply करने की Permission देता है। यह Website की Readability, Visual Appeal और User Experience को बेहतर बनाने में Help कर सकता है।

HTML Heading

HTML में Heading Element को Define करने के लिए Heading Element का Use किया जाता है| Heading Element, 6 Level तक Heading Support करता है| जिन्हें <H1> से <H6> Element द्वारा Define किया जाता है| HTML Headings का use उनकी Importance के Base पर किया जाता है| सबसे अधिक Importance की Heading के लिए <h1> Level Heading का use किया जाता है, और सबसे कम Importance की Heading के लिए <h6> Level Heading का use किया जाता है|

  1. <h1> – यह सबसे Important Heading Tag होता है। यह Article की Main Heading को Define करने के लिए use किया जाता है। इसे आपको Document में एक ही बार use करना चाहिए। Search Engine Crawlers इस Tag से पता लगाते है, की कोई Article किस बारे में है।
  2. <h2> – यह Subheading Tag होता है। इसके द्वारा आप Subheadings Define करते है। किसी बड़े Section को आप इस Tag द्वारा कई Sections में Divide कर सकते है।
  3. <h3> – यह Minor Heading Tag होता है। इस Heading के द्वारा आप Subtopics को भी कई Minor Topics में Define करके Represent कर सकते है।
  4. <h4> – यह Fourth Level का Heading Tag होता है, इससे आप और भी Deep Level पर Content को Sections में Divide कर सकते है।
  5. <h5> – यह Fifth Level Heading Tag होता है, और इससे भी आप Headings को Define करते है। लेकिन इसे Deep Level पर Content को Define करने के लिए use किया जाता है।
  6. <h6> – यह Sixth Level Heading Tag है, इससे भी आप Heading Define कर सकते है। यह Heading Normal Text के बहुत करीब होती है। इससे आप कई Topics को List के रूप में Present कर सकते है।

Example:

””


Output:

Text Formatting

<b> – Bold Text

HTML में Text को Bold करने के लिए <b> Tag का use किया जाता है। यह Tag एक Presentational Tag है| जिसका अर्थ है, कि यह केवल Text की Appearance को बदलता है, और कोई Semantic Meaning Provide नहीं करता है।

Example:

[{"featureType":"landscape.man_made","elementType":"geometry.fill","stylers":[{"color":"#e9e5dc"}]},{"featureType":"landscape.natural","elementType":"geometry.fill","stylers":[{"visibility":"on"},{"color":"#b8cb93"}]},{"featureType":"poi","elementType":"all","stylers":[{"visibility":"off"}]},{"featureType":"poi.business","elementType":"all","stylers":[{"visibility":"simplified"}]},{"featureType":"poi.medical","elementType":"all","stylers":[{"visibility":"on"}]},{"featureType":"poi.park","elementType":"all","stylers":[{"visibility":"on"}]},{"featureType":"poi.park","elementType":"geometry.fill","stylers":[{"color":"#ccdca1"}]},{"featureType":"poi.sports_complex","elementType":"all","stylers":[{"visibility":"on"}]},{"featureType":"road","elementType":"geometry.fill","stylers":[{"hue":"#ff0000"},{"saturation":-100},{"lightness":99}]},{"featureType":"road","elementType":"geometry.stroke","stylers":[{"color":"#808080"},{"lightness":54},{"visibility":"off"}]},{"featureType":"road","elementType":"labels.text.fill","stylers":[{"color":"#767676"}]},{"featureType":"road","elementType":"labels.text.stroke","stylers":[{"color":"#ffffff"}]},{"featureType":"water","elementType":"all","stylers":[{"saturation":43},{"lightness":-11},{"color":"#89cada"}]}]
<!DOCTYPE html>
<html>
<head>
<title>Text Formatting Example</title>
</head>
<body>
<p>This is Normal Paragraph.</p>
<p><b>This is Bold Paragraph.</b></p>
</body>
</html>

Output:

Text Formatting

<strong> – Important Text

HTML में, <strong> Tag का use यह Indicate करने के लिए किया जाता है, कि Enclosed Text का Particular Importance है। यह एक Semantic Tag है| जिसका अर्थ है, कि यह केवल Formatting करने के बजाय Content को Meaning Provide करता है।

Example:


<!DOCTYPE html>
<html>
<head>
<title>Text Formatting Example</title>
</head>
<body>
<p>This is Normal Text.</p>
<p><strong>This is Important Text.</strong></p>
</body>
</html>

Output:

Text Formatting

<i> – Italic Text

HTML में, Text को Italic करने के लिए <i> Tag का use किया जाता है। यह एक Presentational Tag है, जिसका अर्थ है कि यह केवल Text के Appearance को बदलता है |


<!DOCTYPE html>

<html>

<head>

<title>Text Formatting Example</title>

</head>

<body>

<p>This is Normal Text.</p>

<p><i>This is Italic Text.</i></p>

</body>

</html>

Output:

Text Formatting

<ins> Insert Text

HTML में, <ins> Tag का use यह Indicate करने के लिए किया जाता है, कि Text को किसी Document या Web Page में Insert किया गया है। यह एक Semantic Tag है, जिसका अर्थ है कि यह केवल Formatting करने के बजाय Content को Meaning Provide करता है।

Example:

Tile


<!DOCTYPE html>
<html>
<head>
<title>Text Formatting Example</title>
</head>
<body>
    <p>The <ins>new</ins> version of the software includes several new features.</p>
</body>
</html>

Output:

Text Formatting

<sub> – Subscript Text

Subscript Element द्वारा Subscript Text को Define किया जाता है| यह Text, Superscript Text से Opposite होता है| क्योंकि यह Text अपने पास वाले Word से नीचे Show होता है|

Example:


<!DOCTYPE html>
<html>
<head>
<title>Text Formatting Example</title>
</head>
<body>
<p>This is Normal Text.</p>
<p>This is <sub>Subscript</sub> Text.</p>
</body>
</html>

Output:

Text Formatting

<sup> – Superscript Text

Subscript Element द्वारा Superscript Text को Define किया जाता है| यह Text अपने पास वाले Text की तुलना में आधा हो जाता है और Users को पास वाले शब्द के ऊपर नजर आता है|

Example:


<!DOCTYPE html>
<html>
<head>
<title>Text Formatting Example</title>
</head>
<body>
<p>This is Normal Text.</p>
<p>This is <sup>Superscript</sup> Text.</p>
</body>
</html>

Output:

Text Formatting

HTML Comments

Comment एक HTML Code होता है, जिसे Browser द्वारा Read नही किया जाता है| और इस Code को Webpage में Show नही किया जाता है| अर्थात जो Content HTML Comment Tag के अंदर लिखा जाता है, इसे केवल Browsers और Developers ही देख सकते है| End Users इस Content को नही देख सकता है|

HTML Comment Syntax

  1. Opening: Comment की Opening में Less Than Symbol (<), Exclamation Mark (!) और दो Dash () होते है, इसे Opening Tag भी कहते है|
  2. Closing: Closing में दो Dash () और एक Greater Than Symbol (>) होता है, इसेClosing Tag भी कहते है|
  3. Comment Text: Opening और Closing के भीतर जो भी लिखा जाता है| उसे Comment Text कहते है| यह Part हमें Webpage में Show नही होता है|

Example:


<!DOCTYPE html>
<html>
<head>
<title>HTML Comment Example</title>
</head>
<body>
<p><!– Paragraph Starting. –>
This is Thelearnify. Here you can Learn in Hindi.
</p><!– Paragraph Ending. –>
</body>
</html>

Output:

Text Formatting

web

HTML Page Formatting: Adding a new Paragraph, Line Break, and Blank Space, changing page background, Div tags

HTML Paragraph

Web Technology में HTML (Hypertext Markup Language) एक Markup Language है, जिसका Use Web Page का Structure और Content Create करने के लिए किया जाता है। <p> Tag द्वारा Display किया गया Paragraoh Element, HTML में सबसे अधिक Use किए जाने वाले Element में से एक है| और इसका use Web Page पर Textual Paragraph Create करने के लिए किया जाता है।

Paragraph Element एक Block-Level Element है| जिसका अर्थ है, कि यह Detault रूप से अपने Parent Container की पूरी Width लेता है। Developers Font Size, Color और Alignment को बदलने सहित Paragraph Element को Style करने के लिए CSS (Cascading Style Sheets) का use कर सकते हैं।

Example:


<!DOCTYPE html>
<html>
<head>
<title>HTML Paragraph Example</title>
</head>
<body>
<p>Here is First Paragraph Text</p>
<p>This is Second Paragraph.</p>
</body>
</html>

Output:

html

Adding a Line Break

जब आप एक Paragraph में ही New Line शुरू करना चाहते है, तो इसके लिए <br> Element का use किया जाता है| MS Word की तरह Enter Click करके New Line नहीं दे सकते है| <br> Element एक Paragraph में New Line Define करता है| आप Line Breaks की Coding इस प्रकार कर सकते है|

Example:


<!DOCTYPE html>
<html>
<head>
<title>HTML Paragraph Example</title>
</head>
<body>
<p>This is a paragraph  text<br> with line break.</p>
<p>This is <br>another paragraph <br> with line breaks.</p>
</body>
</html>

Output:

html

Inserting a Blank Space

Web Technology में HTML (Hypertext Markup Language) का use Web Page का Structure और Content Create करने के लिए किया जाता है। कभी-कभी, Text या अन्य HTML Element के बीच Blank Space या Gaps Insert करना आवश्यक होता है। HTML में Space Add करने के कई तरीके Provide करता है, जिसमें Non-Breaking Space Entity और <br> Tag Included हैं।

Non-Breaking Space Entity, जिसे &nbsp; द्वारा Denote किया जाता है| इसका use Blank Space Create करने के लिए किया जाता है, जो Line Break या Word Wrapping से प्रभावित नहीं होता है। यह तब use होता है, जब Text को कई Line में टूटने से रोकना चाहते हैं।

Example:


<!DOCTYPE html>
<html>
<head>
<title>HTML Paragraph Example</title>
</head>
<body>
    <p>This text&nbsp;has a&nbsp;few&nbsp;spaces&nbsp;between&nbsp;words.</p>
</body>
</html>

Output:

html

Changing Page Background

HTML में किसी Webpage का Background Color Set करने के लिए Body Element के अंदर Included <style> Tags के अंतर्गत, बहुत छोटा सा Changing करना पड़ता है| Website के Background को Solid Color, Image,  या फिर Animation की तरह Set कर सकते है|

एक Solid Color का Background Set करने के लिए CSS (Cascading Style Sheets) में background-color की Property का use कर सकते हैं। Property को पूरे Page के लिए Background Color Set करने के लिए body Tag पर Apply किया जाता है।

Example:


<!DOCTYPE html>
<html>
<head>
    <title>My Web Page</title>
    <style>
        body {
            background-color: blue;
        }
    </style>
</head>
<body>
<p>This is a Blue Background</p>
</body>
</html>

Output:

html

Div Tag in HTML

Div Tag को Division Tag भी कहा जाता है। HTML में Div Tag का use Webpage पर Content को Divide करने के लिए किया जाता है| जैसे (Text, Images, Header, Footer, Navigation Bar आदि)। Div Tag में Opening (<div>) और Closing (</div>) दोनों Tag होते हैं, और Tag को Close करना अनिवार्य है। Div Tag एक Block Level Tag है।

Example:

Title


<!DOCTYPE html>
<html>
<head>
<title>Div tag</title>
<style>
div {
     color: white;
     background-color: #c20b7c;
     margin: 2px;
     font-size: 25px;
}
</style>
</head>
<body>
<div> div tag 1 </div>
<div> div tag 2 </div>
<div> div tag 3 </div>
<div> div tag 4 </div>
</body>
</html>

Output:

web

Types of HTML Tags & It’s Attributes

HTML Tags

HTML (Hyper Text Markup Language) एक Standard Markup Language है, जिसका Use Web Page Create करने के लिए किया जाता है। HTML Tags, Webpage के Building Block होते हैं, और Page का Structure, Layout और Content को Define करते हैं।

Structural Tags

Structural Tags, Web Page के Overall Structure को Define करते हैं। इन Tags में <html>, <head>, <body> और <title> Included होते हैं।

  • HTML, Document के Root Element को Define करने के लिए <html> Tag का use किया जाता है। अन्य सभी Tag <html> Tag के भीतर Contained होते हैं।
  • <head> Tag का use HTML Document के Head Section को Define करने के लिए किया जाता है। Head Section में Document के बारे में Meta Information होती है, जैसे Title और External Stylesheets और Script के Link।
  • HTML Document के Body Section को Define करने के लिए <body> Tag का use किया जाता है। Body Section में वह Content होते है, जो Page पर Display होती है।
  • <title> Tag का use HTML Document के Title को Define करने के लिए किया जाता है, जो Browser के Title Bar में Display होता है।

Example

<html>
<head>
<title>My Webpage</title>
</head>
<body>
<h1>Welcome to My Webpage</h1>
<p>This is the content of my webpage.</p>
</body>
</html>

Output

html tags

Text Tags

Text Tag, Web Page के Text Content को Define करते हैं। इन Tag में <h1> से <h6>, <p>, <a>, <em>, <strong>, <sup>, <sub>, और <br> Included होते हैं।

  • <h1> से <h6> Tag का use विभिन्न Size के Heading को Define करने के लिए किया जाता है। <h1> Tag सबसे Largest Heading है, और <h6> Tag सबसे Small Heading है।
  • <p> Tag का use Text के Paragraph को Define करने के लिए किया जाता है।
  • <a> Tag का use अन्य Web Page या Resource के लिए Hyperlinks बनाने के लिए किया जाता है। Resource के URL को Specify करने के लिए href Attribute का use किया जाता है।
  • <em> Tag का use Text को Italic करने के लिए किया जाता है।
  • <strong> Tag का Use Text को Bold करने के लिए किया जाता है।
  • <sup> Tag का Use Superscript Text बनाने के लिए किया जाता है।
  • Subscript Text बनाने के लिए <sub> Tag का use किया जाता है।
  • <br> Tag का Use Break Line बनाने के लिए किया जाता है।

Example


<html>
<head>
<title>My Webpage</title>
</head>
<body>
<h1>Heading Level 1</h1>
<p>This is a paragraph of text.</p>
<a href=”https://www.example.com”>Link to Example Website</a>
<strong>This text is bold.</strong>
<sup>Superscript Text</sup>
  </body>
</html>

Output

html tags

List Tag

List Tag, Ordered और Unordered List को Define करते हैं। इन Tag में <ul>, <ol>, <li> Include होते हैं।

  • <ul> Tag का use एक Unordered List को Define करने के लिए किया जाता है। प्रत्येक List Item को <li> Tag के साथ Define किया गया है। Type Attribute का प्रयोग करके इनकी Styling को भी Chnage कर सकते है| Type Attribute की निम्नलिखित Values हो सकती है –
  • disc – यह List Item को Bullet में Set करता है।
  • circle – इसके द्वारा List Item को Circle में Set किया जाता है।
  • square – यह List Item को Square में Set करता है।
  • none – इसके द्वारा List Item का Decoration दिखाई नहीं देता है।

Example


<!DOCTYPE html>

<html>

<head>

<title>HTML List Example</title>

</head>

<body>

<ul type=”square”>

<li>Computer</li>

<li>Tablet</li>

<li>Mobile</li>

</ul>

</body>

</html>

Output

html tags

  • <ol> Tag का Use Order List को Define करने के लिए किया जाता है। प्रत्येक List Item को <li> Tag के साथ Define किया गया है।

The Type Attribute in Ordered List

Ordered List में type Attribute का use List Style Type को Define करने के लिए किया जाता है| By Default <ol> List में List Items के लिए “Number” का use किया जाता है|

  1. Number (Default) – 1
  2. Uppercase Letter – A
  3. Lowercase Letter – a
  4. Uppercase Roman Number – I
  5. Lowercase Roman Number – i
  6. None

Example


<!DOCTYPE html>

<html>

<head>

<title>HTML List Example</title>

</head>

<body>

<ul type=”I”>

<li>Computer</li>

<li>Tablet</li>

<li>Mobile</li>

</ul>

</body>

</html>

HTML Image Tag

Image Webpage को ज्यादा Attractive और Beautiful बनाते है| Readers भी बिना Image के साथ बनाए गए Webpage की Comparison में Image के साथ बनाए गए Pages को ज्यादा Like करते है| इसलिए HTML में Image Element को जोडा गया है| Image Element का use HTML Document (Webpage) में Picture Insert करने के लिए किया जाता है| <img> Tag द्वारा Image को Define किया जाता है|

एक HTML Document में विभिन्न Format में Images को Insert किया जा सकता है| आप PNG, JPEG, GIFs, आदि Format में Image को Add कर सकते है| हम जिस भी Format में Image को Use करना चाहते है, उस Format को Mention करना पड़ता है|

Image Element Attribute

  • src – इस Attribute का use Image के Source URL को Define करता है|
  • alt – इस Attribute का use Image के बारे में Information Provide करने के लिए किया जाता है|
  • style – Style Attribute से Image पर CSS Rules को Apply किया जाता है|
  • width & height – ये दोनो Attributes अलग-अलग use किए जाते है| इनके द्वारा Image के Width और Height को Define किया जाता है|
  • align – इसके द्वारा Image Alignment को Define किया जाता है|
  • border – Image Border को Border Attribute से Define किया जाता है|
  • title – Image को Title देने के लिए इस Attribute का use किया जाता है|